
This article will guide you through the process of creating a layered slide show, just like the one on the Razor demo website.

The slide show on the demo website shows five slides, each with a background and three “layer” images. The “layers” are the images with animation that slide onto the background after it has loaded. These images will be saved as transparent PNG files, this will give the look we want as they glide across the background.
You can emulate the demo slide show with your own images making as many slides and layers as you need. For the purpose of this tutorial we are going to make just two slides to demonstrate the process
The important thing to remember when creating your images is they all should be the same width and height. This will make things much easier and produce the best results. When designing your slides keep in mind that the lower 50px of each slide is overlayed by the semi-transparent menu.
1. Create the slide show
With our images prepared we can now create our slide show in Razor and slot the components into place.
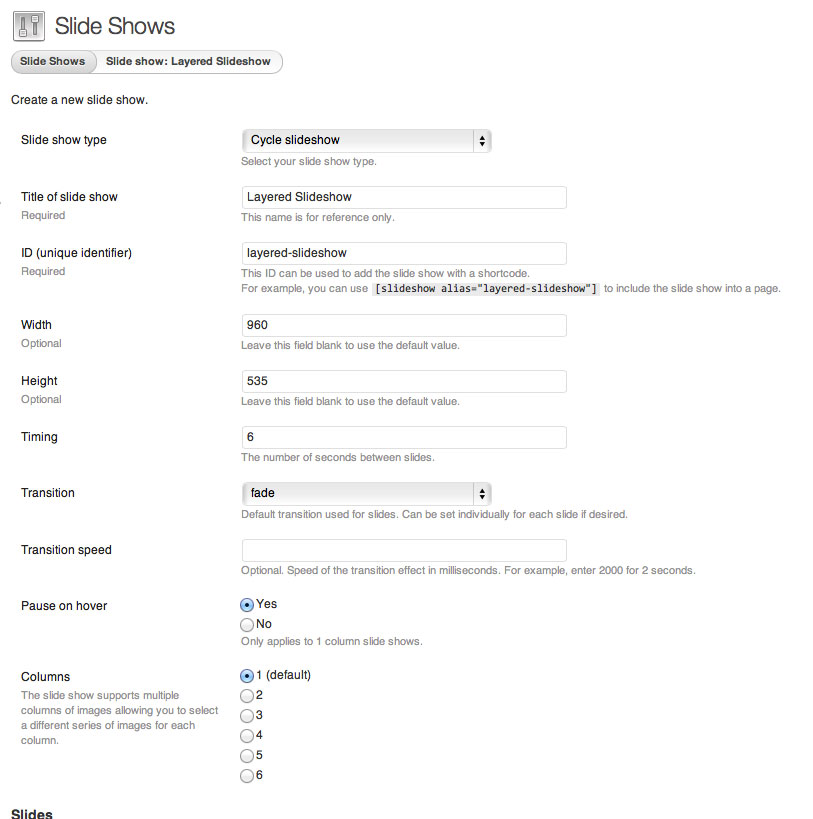
- Slide show type: Cycle slideshow
- Title of slide show: Layered Slideshow
- ID (unique identifier): layered-slideshow
- Width: 960
- Height: 535
- Timing: 6
- Transition: fade
- Transition speed: leave blank for default
- Pause on hover: Yes
- Columns: 1
When you are ready click the Save Slide Show button to return to the Appearance > Slide Shows page.
2. Make the slides
Now let’s go through the process of creating one slide.
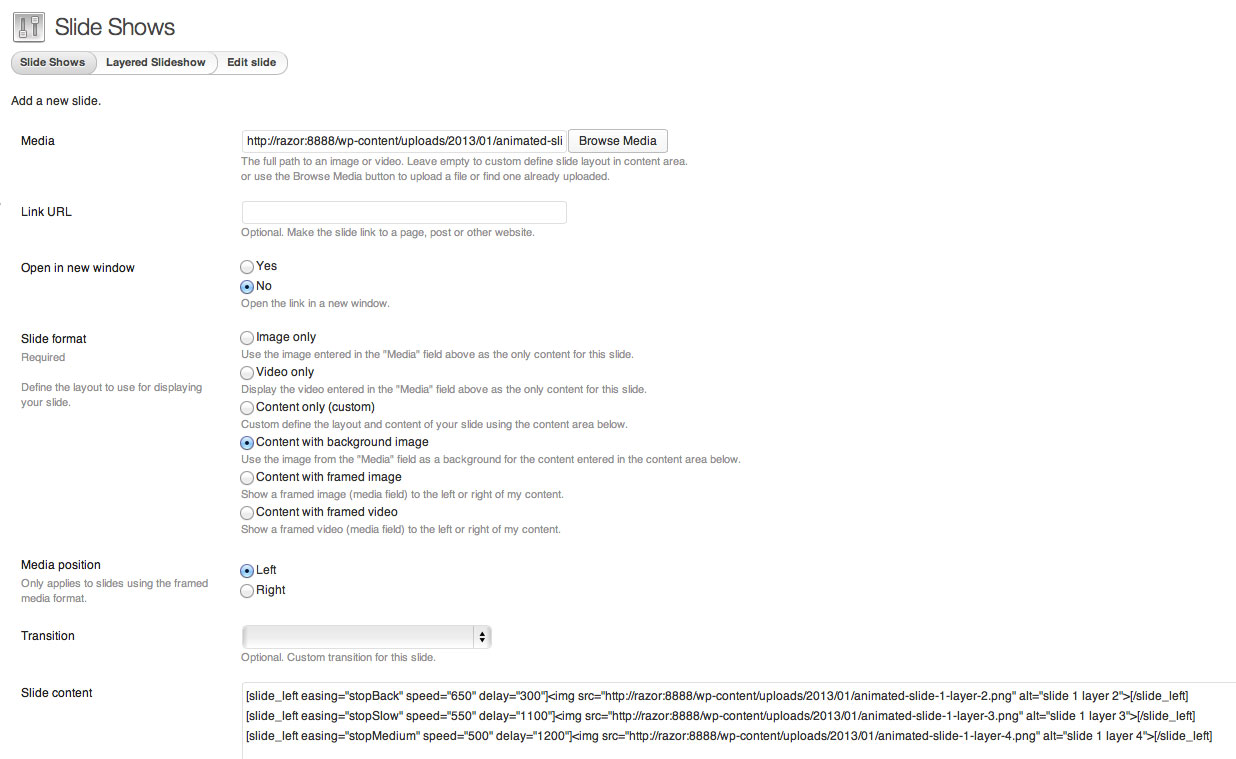
- Media: the path to a background image
- Slide format: Content with background image
- Transition: leave blank
- Slide content: see below
As you can see from the settings, each slide will comprise a background image and then some content. For this content we are going to use two shortcodes that are built into the theme: [slide_left] and [slide_right]. Here is the content for the first slide:
[slide_left easing="stopBack" speed="650" delay="300"]<img src="/the/path/to/slide1-layer2.png" alt="slide 1 layer 2">[/slide_left]
[slide_left easing="stopSlow" speed="550" delay="1100"]<img src="/the/path/to/slide1-layer3.png" alt="slide 1 layer 3">[/slide_left]
[slide_left easing="stopMedium" speed="500" delay="1200"]<img src="/the/path/to/slide1-layer4.png" alt="slide 1 layer 4">[/slide_left]
You will notice these shortcodes and their attributes documented on this slide options screen, just below the content box and before the Save Slide button. Now go ahead and click the save button to return to the Layered Slide Show settings page.
That’s one slide finished, now you can preview it or continue on making the next slide.
Slide 2
Now we need to add our second slide using the same steps but changing the images. We will also switch the [slide_left] shortcode for the [slide_right] one to add some variation. Below is the content for next slide. Don’t forget to also change the background image in the “Media: input at the top of the page. You should click the Save Slide Show button after completing the settings for each slide.
[slide_right easing="stopBack" speed="650" delay="300"]<img src="/the/path/to/slide2-layer2.png" alt="slide 2 layer 2">[/slide_right]
[slide_right easing="stopSlow" speed="550" delay="1100"]<img src="/the/path/to/slide2-layer3.png" alt="slide 2 layer 3">[/slide_right]
[slide_right easing="stopMedium" speed="500" delay="1200"]<img src="/the/path/to/slide2-layer4.png" alt="slide 2 layer 4">[/slide_right]
Don’t forget to click the Save Slide Show button after completing all your settings.
3. Deploy the slide show
And that’s it. Now our layered slideshow will be used on whatever type of pages are set to use a layout that uses the header we just edited. ![]()
Resources
- Shortcodes: http://para.llel.us/themes/razor-wp/shortcodes/
- Support forum: http://para.llel.us/support/groups/razor/forum/

