
In this article we are going to build the layout for a home page. We will not be concerned with actual content, this will be your task once the structure is in place. This article is about the layout of the home page.
Now then. We are going to do this from scratch. We are not going to use or modify any of the design elements that come ready set-up with the theme because we will learn a lot more if we do it ourselves. Don’t worry, it doesn’t take very long, and I promise that it will be time well invested.

OK, end of lecture, let’s go and get our hands dirty.
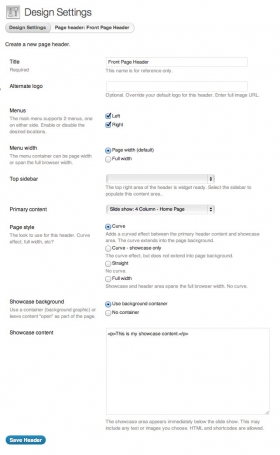 The settings for our Front Page header.1. Make a page header
Go to Appearance > Design Settings and underneath the Layouts heading click the Add new Header button. The Title is required so let’s name our header “Front Page Header”. Leave the Alternate logo box empty, then make sure that Left and Right are selected for the Menus option, and that Page width (default) is selected for Menu width.
Leave the Top sidebar drop-down menu set to nothing, and for Primary content select Slide show: 4 Column – Home Page. As I said, we are not concerned in this tutorial with content so for the purposes of this tutorial let’s just use Mingle’s demo slideshow. It’s easy to come back later and change this after you have created your own slideshow.
Next select the Curve page style and Use background container for the Showcase background. For the Showcase content itself let’s just use some placeholder text such as this:
<p>This is my showcase content.</p>
That’s our page header completed, so click Save Header to return to the design settings page.
 The settings for My Website Footer.2. Make a footer

We’ll leave the middle bit for the moment, let’s next quickly create a footer that we can later fill with our custom content.
In Appearance > Design Settings underneath the “Layouts” heading click the Add new Footer button. Name this footer “My Website Footer”.
For the Footer – top content use:
<p>This is the top footer for My Website Footer.</p>
And for the Footer – bottom content use:
<p>This is the bottom footer for My Website Footer.</p>
That’s all there is to the footer – you can come back later and and give these areas whatever content you like – so click Save Footer to return to the design settings page.
3. Now for the bit in the middle
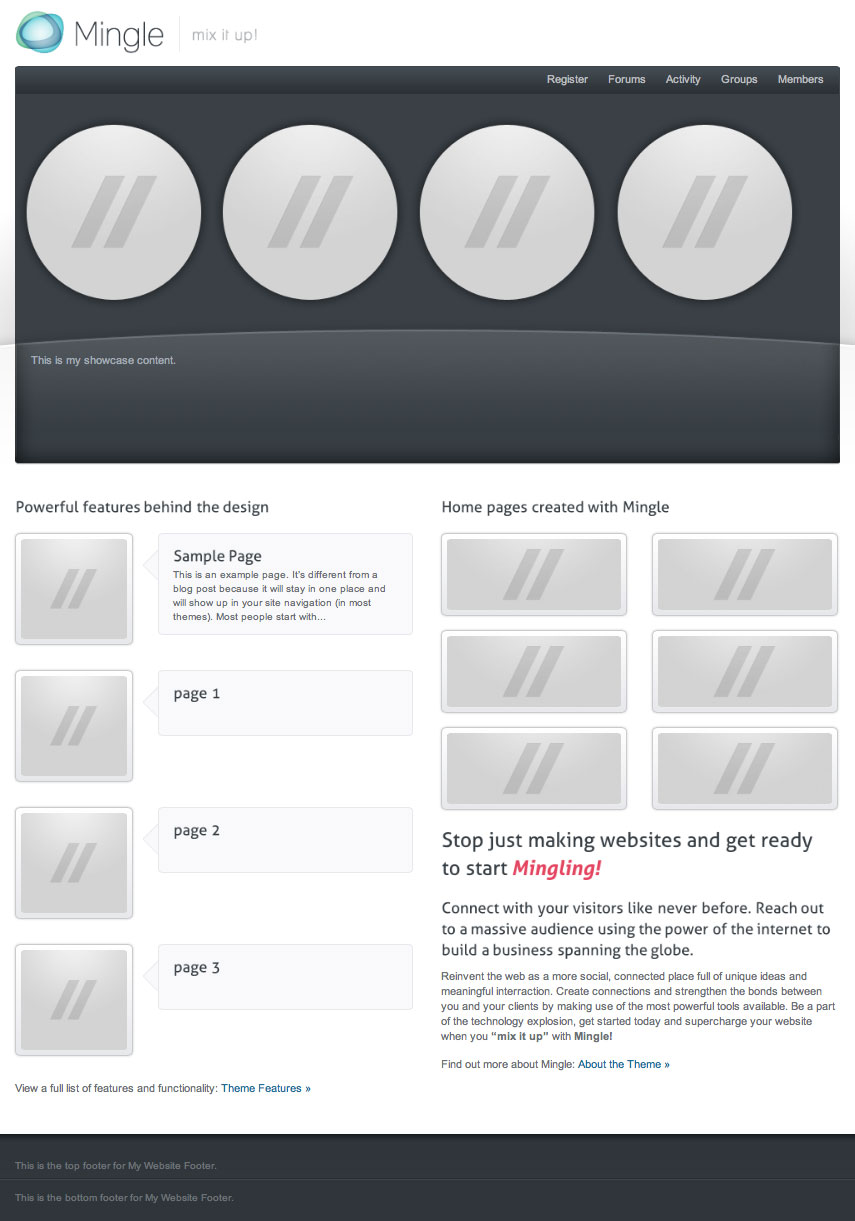
With our page header and footer components completed, all that’s left is the bit between them – the content area. We are going to emulate the content area of the skin 1 home page on the demo website:
http://para.llel.us/themes/mingle-wp/
For this we have a half-page column on the left promoting some example pages from the site, and another half-page column on the right which has a little two-row portfolio above some marketing blurb.
You are not going to believe how easy this is.
In your dashboard select Pages > Add New and name this new page “frontpage left”.
For the content we are going to use a [blog] shortcode to display the featured image and an excerpt for four of our previously created pages. So please switch to the HTML editor and paste in this content:
<h3>Powerful features behind the design</h3>
[blog post_type="page" page_id="10,19,34,62" images="true" image_width="128" image_height="120" post_content="excerpt" excerpt_length="33" show_date="false" author_link="false" comments_link="false" show_category_list="false" show_tag_list="false" posts_per_page="4" paging="false" read_more="-1"]
<p>View a full list of features and functionality: <a href="#" title="View all theme features">Theme Features »</a></p>
In the [blog] shortcode above I have used the page ID numbers 10, 19, 34 and 62. I chose these numbers at random, you of course will need to use the page ID numbers of actual pages on your website. To find the ID of a page go to Pages > All Pages, hover the mouse pointer over the page name and look in the browser’s status bar; you will see a parameter that begins post= and the number after the equals sign is the page ID.
So that’s one half of the front page finished and we can Publish it.
Moving swiftly on, next create another new page and name it “frontpage right”.
For this content we need to use the [portfolio] shortcode above a couple of headings and a paragraph of text. So please switch to the HTML editor and paste in this content:
<h3>Home pages created with Mingle</h3>
[portfolio category="11" columns="2" content_width="478" image_ratio="209:86" title="no" excerpt="no" posts_per_page="6" paging="false"]
<h1>Stop just making websites and get ready to start <em>Mingling!</em>
<h3>Connect with your visitors like never before. Reach out to a massive audience using the power of the internet to build a business spanning the globe.</h3>
<p>Reinvent the web as a more social, connected place full of unique ideas and meaningful interaction. Create connections and strengthen the bonds between you and your clients by making use of the most powerful tools available. Be a part of the technology explosion, get started today and supercharge your website when you <strong>"mix it up"</strong> with <strong >Mingle!</strong></p>
<p>Find out more about Mingle: <a href="#" title="Find out more about Mingle">About the Theme »</a></p>
Similar to the [blog] shortcode before, for the [portfolio] shortcode I have used the category ID number 11 chosen at random, you of course must use the category ID of the actual category to which your portfolio items have been assigned.
When you are finished, Publish the page and give yourself a pat on the back because that’s it, the front page content is finished.
4. Bringing it all together
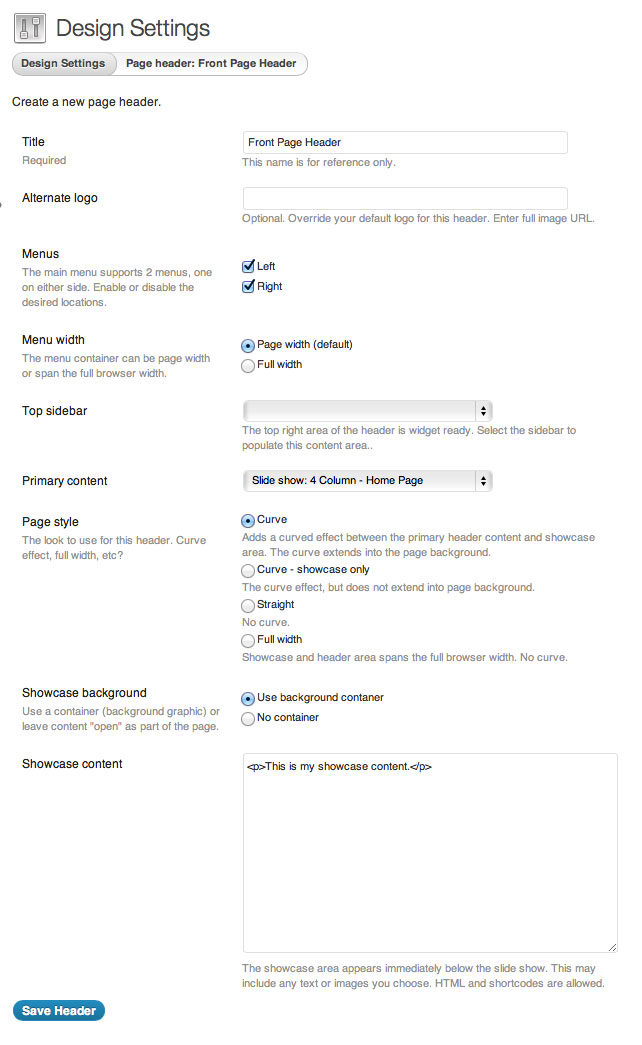
With all of our components now completed it is time to make the layout.
From the Header drop-down menu select Front Page Header, and from the Footer drop-down menu select My Website Footer.
Leave the Skin override drop-down menu set to nothing.
Now for the content layout. Drag a 1/2 Container from the Content Containers list into the large empty area underneath to the left, and drop it there. That’s the two half page columns sorted. Now we need to specify what we want to publish in these columns, so from the Page Elements list on the right drag-and-drop a Static Content page element into each of the half page containers. For the left-hand container select the “frontpage left” page to be our static content, and for the right-hand column select the page that we named “frontpage right”.
Lastly, click the Save Layout button to save out layout to the database and return to the design settings page.
Scroll to the bottom of the page and click the Save Settings button.
For tips on how to create what I call “local” layouts – e.g. for the footer areas or for the showcase area – zip across to the Mingle support forum and look in the FAQs topic, and also search the forum because I know that plenty of clues and hints and tips have been published. For example, a very common question is how is the multi-column top footer created on the demo website. The answer to this question and many others can be found in the support forum.
Good luck, and don’t forget that when you are finished you can show off your work to your fellow Minglers in the Mingle Website Showcase. ![]()
Resources
- Shortcodes: http://para.llel.us/themes/mingle-wp/shortcodes/
- Support forum: http://para.llel.us/support/groups/mingle-wordpress/forum/
- Mingle website showcase: http://para.llel.us/support/groups/mingle-wordpress/forum/topic/mingle-website-showcase/

