
The first thing to mention about the [portfolio] shortcode is that it is not a “gallery” plugin and it has not been designed to replace the functionality of the standard WordPress built-in [gallery] shortcode. The [portfolio] shortcode was designed to provide us with an alternative way of presenting a portfolio of our work, where each portfolio item has its own page on which details of the work can be published.
Sometimes you might want a simple gallery of images which open enlarged images when clicked. This is what the WordPress [gallery] plugin was designed to do, along with quite a few gallery plugins which may also provide enhanced features. The [portfolio] shortcode was not designed to compete with any of these; it has a specific use, hence its name – portfolio.
So let’s get started with creating our portfolio. Note that we can use pages or posts for our portfolio items and later we will look at how we can use pages to create a portfolio. For the purposes of this tutorial we are going to use posts because it enables some extra flexibility that we will discuss later, once we have learned the ropes.
1. Create the category
First let’s create a category for our portfolio items. It may be that our portfolio is varied and extensive and we may want several categories, or even parent and children categories, but for the moment let’s just create the one category. In your dashboard go to Posts > Categories and under Add New Category enter “Portfolio” for the Name and “portfolio” for the Slug. Make a note of the category ID. Hover the mouse over the category and in the browser’s status bar; you will see “tag_ID=” and the category ID. We don’t need a description so go ahead and click Add New Category to add it to the list on the right.
Before we leave this page we need to make a note of the ID number for our new category. Hover the mouse pointer over the Portfolio category name and look in the browser’s status bar; you will see a parameter that begins tag_ID= and the number after the equals sign is the category ID. For me this number is 11, but for you it may be a different number. Make a note of this number because we will need it later.
2. Create the portfolio index page
With our category set up, the next job is to create our Portfolio index page, the page that is going to showcase all of our work. There is no need for the index page itself to be a post, it is more natural to use a page for this, so in your dashboard go to Pages > Add New and let’s name our index page “Portfolio”. In the Discussion metabox disable the comments and trackback options; if you can’t see a Discussion metabox then click on Screen Options (top right) and enable the Discussion option.
Don’t worry about content at this stage, just Publish the page.
3. Create the portfolio items

Go to Posts > Add New and give your portfolio item an appropriate short title; don’t fuss over it too long, you can always change it later.
We’re not worried about content at this stage, however it will be useful to have some text in the post so make sure you are using the Text editor (not the Visual editor) and below is some placeholder content we can use for now:
<p>Loreros nulput adiam dui endre facin ex eugiat luptatum volor amet diamet, con henisci tet praesequat. Duis nullaor augait amet dolore tat vendip el dui ex ea feuguer aliquat utatin eugiam, veliquam, quipit numsan henisi.</p>We don’t want people to comment on our portfolio items so in the Discussion metabox disable the options for comments and trackbacks.

When the image has finished uploading we are presented with an overview of our media library and the Attachment Details panel for the image we just uploaded. Let’s not worry about these here because this tutorial is not about media settings. It may be useful to make a note of the image dimensions for future reference. All we need to do here is click the Set featured image button at the foot of the Attachment Details panel.
All that’s left is to scroll back to the top of our portfolio item post and click the Publish button.
OK. This is where I get to go and make a cup of coffee while you create a few more portfolio items. For the purpose of this tutorial please create at least four, but beyond that you can create as many as you like. Off you go. I’ll see you in a bit…
4. Do the shortcode
With all of our preparation now completed it is time to actually use the [portfolio] shortcode. Go to Pages > All Pages and click on our Portfolio page to edit it.
Below is the shortcode we will be using. We’ll discuss each setting in more detail as we continue but before pasting in this content please make sure you are using the Text editor (not the Visual editor) and also scroll down to the Content Options metabox and set Auto Paragraphs to “Off”.
[portfolio
  category       = "11"
  columns        = "2"
  content_width  = "649"
  image_ratio    = "3:2"
  link           = "lightbox"
  title          = "yes"
  excerpt        = "yes"
  excerpt_length = "19"
  posts_per_page = "12"
  paging         = "true"
  margin         = "25"
  order          = "desc"
  orderby        = "date"
]
Note that above I have deliberately formatted the shortcode with one attribute per line and used spacing so that it is easier for us to see each setting and make tweaks if we want to. You don’t have to do this, you can put it all on one line if you prefer. However if you do format it one attribute per line then you absolutely must disable auto paragraphs for this article otherwise WordPress will put paragraph and breaks tags all over the place and the shortcode will not be interpreted correctly.
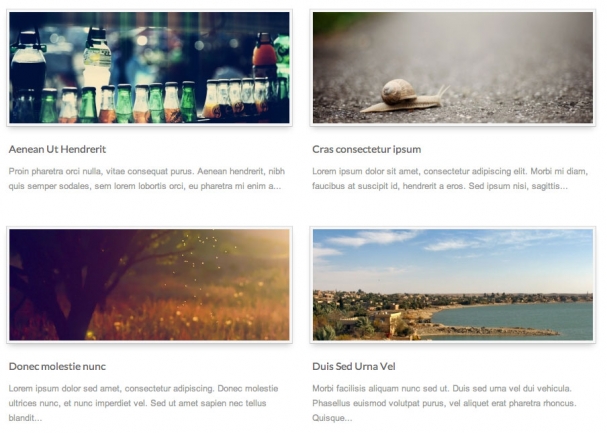
So for the content of our Portfolio page we use the above shortcode. Later we can spruce up this page with some more content if we like, I’ll leave this bit up to you. For the time being, slap the shortcode in the content and click the Update button.
Take a moment to look at the result by clicking the “View Page” button at the top of the edit page screen.
Chances are it doesn’t look exactly how you want your final portfolio page. Once you understand all the settings you’ll be able to create your own customised shortcode to make your portfolio page look just the way you want it to look.
On the portfolio shortcode documentation page there is a list of attributes that we can use with the shortcode. Don’t allow yourself to be intimidated by this list, it is just a bunch of settings. Let’s go through them.
First, the category attribute. If you remember, way back at Step 1 we created a category and made a note of its ID number. The ID number I have used is 11, however you will need to use the ID of your Portfolio category.
This attribute accepts a comma separated list of category IDs, so if our portfolio items are in various different categories we can feed the category attribute with a list of all the category ID numbers. We could create a separate portfolio index page for each category, however, keep in mind that if you created child categories you can’t just specify the parent category ID to have all the child categories included in the output, you need to include the category attribute with each category ID you want shown. It will not automatically show child categories when you enter a parent ID because the child has its own ID. If we want to do the parent/child thing we can use pages instead of posts and use the post_parent attribute. More on this later.
The columns attribute speaks for itself, and it needs to be thought about in conjunction with the content_width attribute. This stuff about the content width is very important so pay attention because here comes the science.The content_width attribute is not a request, it is a required attribute.
Most setting are requests, i.e. they are you saying “this is what I want”. The content_width attribute is not a request, it is required information and therefore it is a required attribute. The way the column widths are calculated is by dividing the available content width by the number of columns requested, and because there is no way for the shortcode to find out for itself how much content width is available, we need to provide this information. It’s no good guessing at it, if we want good results then we need to be precise with this value.
These are some standard column widths for the theme.
- Full width: 880
- 1/2 width: 420
- 1/3 width: 267
- 2/3 width: 573
- 1/4 width: 190
- 3/4 width: 649
Note that in the example [portfolio] shortcode above I have set the content_width attribute to 649. This is because my page layout uses a 1/4 width sidebar, leaving 3/4 width for my content. If, for example, I had been using a 1/3 width sidebar then my content_width attribute would need to be set to 573.
It is important that we get the content_width value correct because if we tell the shortcode that there is more content width available than there actually is, then the column widths will be calculated incorrectly and we will get a messy layout, probably with one or two columns wrapping and displaying underneath the other columns.
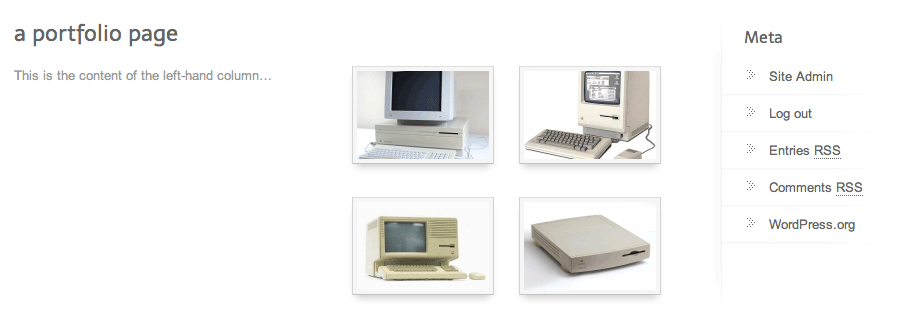
The content width doesn’t have to be one of the standard column widths, it can be anything we like. For example, let’s say we have a 3/4 width page layout and we use the [one_half] column shortcodes to divide our page content so that we can have portfolio thumbnails in one column and something else in the other column. In this case the content width will need to be calculated.
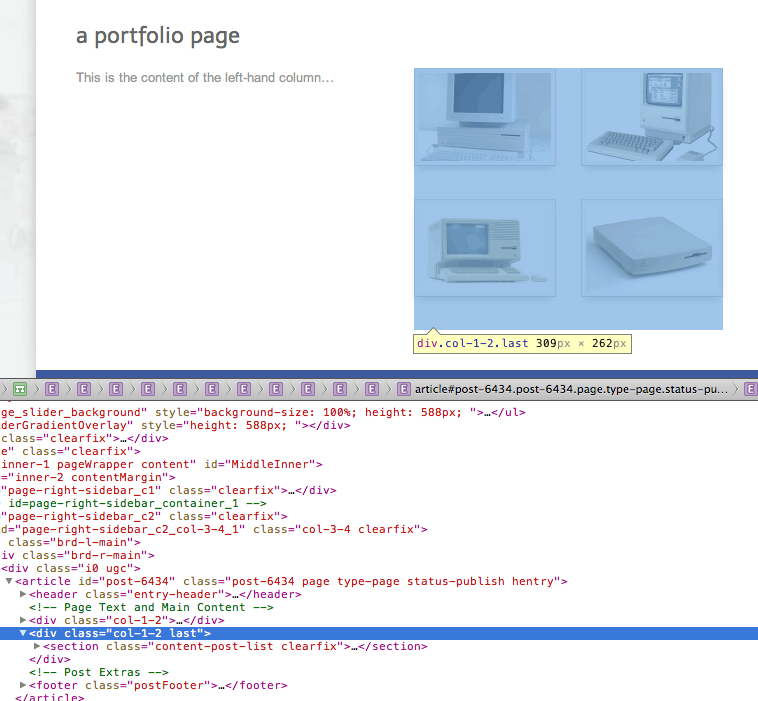
It is not going to be exactly half of 649 because there is some white space (a margin) between the two columns. For this scenario it comes to 31 pixels of white space so each of the 1/2 columns is 309 pixels wide. And this would be the number that we would need to feed to the content_width attribute.
[one_half]
<p>This is the content of the left-hand column...</p>
[/one_half]
[one_half_last]
[portfolio category="11" columns="2" content_width="309" image_ratio="3:2" link="lightbox" title="no" excerpt="no" posts_per_page="6" paging="true"]
[/one_half_last]
I find that the easiest way to learn how much content width is available is to use the developer tools built into browsers, or use the Firebug add-on for the Firefox browser. You can point at elements (such as columns) and “inspect” them to quickly find out how wide they are.
So always remember that if your portfolio layout looks weird it could be a result of not having the correct content_width. Remember, this attribute is not a request – you are not asking for an amount of width to be made available, you are telling the shortcode how much width there actually is available.
And so we come to my favourite attribute, the image_ratio attribute. No kidding, I love this attribute because it enables me to use the shortcode in different ways for different purposes without it always looking like some kind of gallery.If your portfolio layout looks weird it could be a result of not having the correct content_width
I once developed a website for a client who provided services for a wide range of people, so instead of listing just the services the client provided we listed the type of people catered for, and each type of person had a separate page describing how the client’s services specifically benefited that type of person. The [portfolio] shortcode was brilliant for this as it enabled me to create a very attractive index page with “mini header images” (short and wide) to click on, with titles and descriptions underneath each. When the client first saw it, he grumbled “I like it a lot. But how long did that take?” thinking it was going to cost him a small fortune, but he brightened up considerably when I told him that it took approximately 60 seconds and that it is self-updating.
I think the image_ratio attribute is fairly self-explanatory, and some quick experimentation by yourselves will drive home precisely what it does – for example a value of 2:1 tells the shortcode that you want the thumbnails to be twice as wide as they are high, a value of 5:2 tells the shortcode that you want the thumbnails to be two-and-a-half (five over two) times wider than they are high, a value of 1:2 tells the shortcode that you want the thumbnails to be half as high (one over two) as they are wide.
There is one thing about the image_ratio attribute that I want to point out. Occasionally it may be the case that you want the thumbnails to display the entire image rather than a cropped area of the image. To achieve this, first you will need to make sure that all the featured images themselves are the exact same dimensions. Let’s say that for some design reason or another the featured image dimensions are all 300 x 900 portrait aspect. If we use standard aspect ratios such as 3:2 or 4:3 or 1:2 with these images then the thumbnails are always going to be cropped, so what ratio should we use?
An image_ratio value of 2:1 tells the shortcode you want the thumbnails twice as wide as they are highHave you got it yet? Yup, I think you got it, in this case the value to use with the image_ratio attribute would be 300:900, which is 3:9, which is 1:3. But what if we had a different number, something like 311 x 945. We don’t need to waste time, we can simply enter the ratio as 311:945 and the theme will do the rest. Remember, this is not a size we are specifying, this is an aspect ratio.
The remaining attributes are I think self-explanatory so we will zip through them fairly swiftly.
The link attribute decides what happens when a thumbnail image is clicked. If we want the click to go to the post or page for the portfolio item then we use the link="post" attribute, otherwise we use link="lightbox". If we leave out this attribute then it will default to the lightbox setting.
The title attribute decides whether the title of the portfolio item post or page is displayed in a box underneath the thumbnail. Note that the title is always linked to the post or page for the portfolio item, there is no option to change or disable this.
The excerpt attribute tells the shortcode whether it should display an excerpt from the portfolio item’s content or not, yes or no. And the excerpt_length attribute tells the shortcode how many words to use in the excerpt after which “…” will be tacked on.
Because very long pages of thumbnails can be visually confusing it is always best to limit the number of thumbnails on a page to what I call “an eyeful”. In the example shortcode for this tutorial I think three rows of four thumbnails will be a maximum before there is a risk of visual overload kicking in, hence the posts_per_page="12" attribute. And because there is likely to be more than 12 items in my portfolio I have enabled pagination with the paging="true" attribute.
Next is the margin attribute which enables us specify the exact number of pixels there should be between each column of portfolio items. If we leave out this attribute then it will default to an appropriate amount of white space between columns. If we wanted our thumbnails to be more spaced out or closer together, this is the attribute we would tweak. If we add more or less white space between columns then the portfolio thumbnail widths will automatically adjust.
So there you have it, we’re all done, that’s the [portfolio] shortcode.
Tutorial finished, We are now going to look at some of the other hoopy things we can do with the [portfolio] shortcode.
Sorting the list
There are going to be occasions when we will want our portfolio items sorted into a particular order. For example, if we want the items sorted into alphabetical order then we would add orderby="title" and order="asc" attributes to our shortcode, like this:
[portfolio category="11" columns="4" content_width="687" image_ratio="3:2" link="lightbox" title="yes" excerpt="yes" excerpt_length="19" posts_per_page="12" paging="true" orderby="title" order="asc"]The sort order can be ascending or descending, and currently WordPress has 10 different sort options:
- none
- id
- author
- title
- date
- modified
- parent
- rand
- comment_count
- menu_order
Let’s have a quick look at how sorting the list can help us to provide varied and interesting content.
If we wanted to sort the list so that the most recent portfolio item is first (top left column) and the oldest is last (bottom right column), then we would add orderby="date" order="desc" to our shortcode.
Alternatively, if we wanted a similarly sorted list but we also wanted any existing portfolio item that gets modified to jump to the top of the list, then we would use orderby="modified" order="desc" with our shortcode.
What about if we wanted to add a [portfolio] shortcode to our home page content that displayed three random portfolio items picked from our entire portfolio? How would we do this? Well, we might use a shortcode such as this:
[portfolio category="11" columns="1" content_width="210" image_ratio="3:2" link="lightbox" title="no" excerpt="no" posts_per_page="3" paging="false" orderby="rand"]Notice that we have set the content_width attribute in the above to 210; this enables our little list of three items to fit into a 1/4 width container in our home page layout.
So you can see that just by sorting the list we have developed five different and interesting ways of presenting the same basic content.
What about video!
If we want to present a portfolio of videos, this is very easily achieved.
Control the dimensions of the video by adding width and height parameters to the URL.Edit one of the portfolio item posts you created earlier and scroll down the page until you see on the right-hand side a metabox named Media. The box labelled URL is where we paste the web address of our video. The video can be hosted on Vimeo or on YouTube, and keep in mind that if it is on YouTube then you need to click on Share and then Options and select the Long link option; so the URL you use might look something like this:
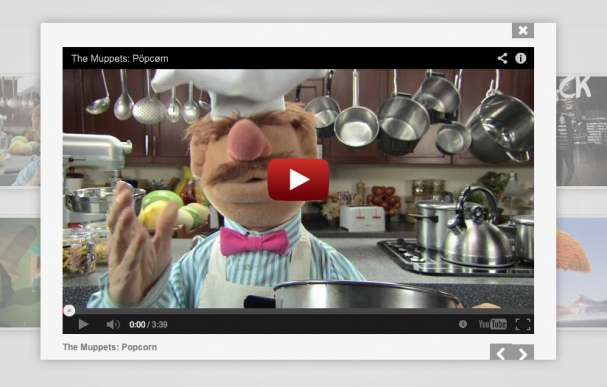
http://www.youtube.com/watch?v=B7UmUX68KtEThis will result in the YouTube hosted video opening in a lightbox when the featured image for this post or page is clicked on. We can control the dimensions of the video by adding width and height parameters to the URL, like this for example:
http://www.youtube.com/watch?v=B7UmUX68KtE?width=1280&height=720Note that in the Media metabox the Title we enter is displayed in the lightbox underneath the video.
So this is all we need to know about creating a video portfolio instead of an image portfolio. Naturally, if we were doing this then we would probably set the featured image for each portfolio item to be a still from the video, and possibly we might enhance the image by adding a “play” button on top of the image. But this is content preparation and beyond the scope of this article so we won’t go any further down that road.
What about pages!
Now, as promised, a brief discussion about using post_type="page" – i.e. pages for our portfolio items instead of posts.
We know that WordPress has two types of content, posts and pages, and although there are a number of technical differences between the two types of content the only differences that concern us are that pages do not have categories, and that pages can have children.
The question is, why bother using pages for portfolio items when it can all be done with posts?
The answer is because some people might find it more convenient to organise their portfolio structure with the index page being the parent page and all the portfolio item pages being children of that parent page.
“Is it better to do it this way?” I pretend to hear you ask. It makes little difference really, it just depends on which way you prefer to work.
The other thing about using post_type="page" is that you can target particular pages by using the page_id attribute. This might be useful in a situation where you don’t have an organised portfolio as such but want to create one instead from the featured images of (say) various products and/or services provided by you or your company. You couldn’t do this with posts, and of course it is more natural anyway to make content about products and services pages rather than posts.
So it just boils down to whatever is best for the particular situation.
And finally…
I want to finish up by pointing out some undocumented features of the [portfolio] shortcode.
OK, they were undocumented before I went and documented them here.
Something I found useful quite recently was to create various portfolio index pages based on tags that had been applied to a portfolio item post rather than on the category the post had been assigned to.
To achieve this we can simply add the tag="tag-slug" attribute to the shortcode. This will work on its own – i.e. with no category attribute used in the shortcode – or in combination with the category attribute. Note that in this case the parameter we use is the actual tag slug string, not an ID number – tag="web-sites" for example or tag="sculpture". If you wanted to use ID numbers for tags (just like with the category attribute) you can do so by using the tag_id attribute instead.
Here’s another good one. Let’s say for the sake of argument you have a couple of dozen categories and what you want to do on an index page is display thumbnails for all categories except for one. How do we do that without having to list a couple of dozen category IDs and also having to remember to update the shortcode if we add a new category?
What we do is go find the category ID of the excluded category (let’s say it is 99) and then we use cat="-99" with the shortcode. Note the minus sign before the 99. So the attribute means “use all categories except the category with the ID number 99″.
Hm? OK, one more for the road. How about all portfolio items that have been posted by a particular author?
Go find the ID for the author (just as we did for the category in Step 1 of the tutorial) and use the author="999" attribute, where “999″ is the ID of the particular author. Again, this can be used on its own – i.e. without a category attribute – and it will create thumbnails for all posts by that author, or it can be used in combination with the category attribute and/or the tag attribute, and you can also use it in combination with the post_type="page" attribute to create thumbnails of pages created by that author.
A lot is possible with the [portfolio] shortcode and I hope I have shown you that, despite its intimidating appearance at first sight, it is actually quite simple to master. I have found it so useful in so many situations that I sometimes wonder how I ever managed without it. In the past I did manage without it, but it took me ages to do what I do now with the [portfolio] shortcode very quickly.
I love this shortcode because it made me a better website designer, and I reckon it will do the same for you. ![]()
Resources
- Shortcodes: http://para.llel.us/themes/razor-wp/shortcodes/
- Support forum: http://para.llel.us/support/groups/razor/forum/

